Image Creation #
and#
Malipulation #
using#
GIMP#
CSC 101 - Introduction to Computer and Applications Robert Willhoft, 2009
Vignette#
Introduction to Layers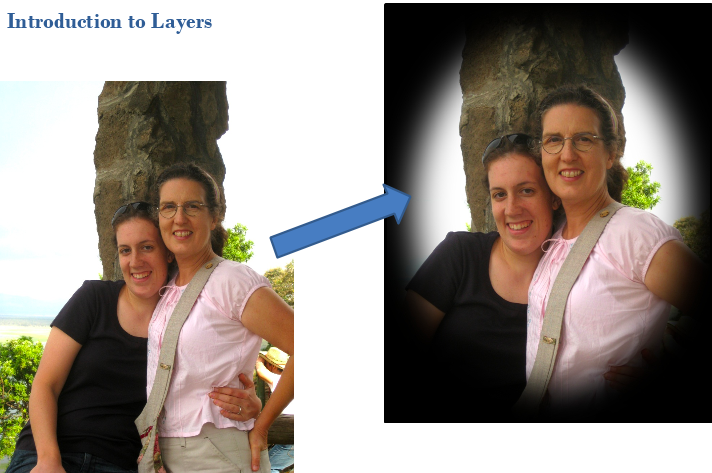 |
Selection Tools#
- Rectangular
- Ellipse
- Free Select
- Fuzzy Select
- Select by Color
- Scissors
- Foreground
Step #1 - Create Background Layer#
- Load Faith & Adrienne picture
- Create a new layer
- Layer ► New Layer
- Name the new layer Black Vignette
- Select the foreground color button
- You should have 2 layers
- Drag the new layer below the picture
- You make layers visible or invisible by clicking on the eye
- The layer with the white border is the active layer
Step #2 - Create Mask from Selection#
- Create a Mask using the Ellipse Selection tool
- Select an area around Adrienne and Faith
- Be sure that you have the Faith & Adrienne.jpg layer selected
- Layer ► Mask ► Add Layer Mask
- Initialize Layout Mask to: Selection
- Turn off your selection
- Selection ► None
Step #3 – Blur the Mask#
- Adjust
- the Vignette
- Select the mask
- Blur the border
- Filters Blur ► Gaussian Blur
- Make sure Horizontal & Vertical are locked
- Enter 400
- Filters Blur ► Gaussian Blur
- Blur the border
- Crop the picture
- Select the picture
- Use the crop tool so it is centered
Vignette#
Finished Image#
Export as:simpleVignette.jpg
Warning: Once you export an image as a JPEG (jpg) all of the layer information is gone.If you want to save the layers use the Save option, which saves a GIMP XCF image file format (xcf).
However, XCF files are huge, so don’t save any of the lab files this way!
Vignettes #
with White or Color Backgrounds#
Highlighting Foreground #
Using Free Selecthere picture
Step #1 - Create Layer#
- Load Phone Booth picture
- Duplicate the layer with the picture
- Layer ► Duplicate Layer
- You should have 2 layers
- Rename the top layer
- Double-click the layer name
- Change name to Phone Booth
- Rename the bottom layer
- Double-click the layer name
- Change name to Background
Step #2 - Create Mask#
- Create a Mask using the Free Select tool
- Select an area around the phone booth
- Be sure that you have the Phone Booth layer selected
- Layer ► Mask ► Add Layer Mask
- Initialize Layout Mask to: Selection
- Turn off your selection
- Selection ► None
Step #3 - Adjust the Layers#
- Adjust the Mask
- Select the mask layer
- Blur the mask
- Filters Blur ► Gaussian Blur
- Make sure Horizontal & Vertical are locked
- Enter 400
- Filters Blur ► Gaussian Blur
- Adjust the Background layer
- Select the Background layer
- Use Colors ► Brightness & Contrast
- Decrease Brightness (quite a bit, like -125)
- Decrease Contrast (a little, like -15)
- Blur the layer (about 100)
- Export as freeSelect.jpg
Partial Color Effect#
Using ForegroundSelect Tool
pictureStep #1 - Create Layer#
- Open Galen picture
- Use Scissors Select tool to cut around the picture
- Click on the actual line that you want to cut along
- Be sure that you click on the first point at the end
- Click inside – you should get a dotted line around your selection.
- Use this selection to create a mask
- You should see grey checkerboard behind the two figures that you cut out.
Step #3 - Create Mask#
- Create a Mask
- Be sure that you have the Foreground layer selected
- Layer ► Mask ► Add Layer Mask
- Initialize Layout Mask to: Selection
- Do not blur the mask
- Turn off your selection
- Selection ► None
Step #4 – Adjust Background#
- Touch up around the mask by painting black or white in the mask layer
- Convert Background to B&W
- Select Background layer
- Colors ► Desaturate
- Export as Partial Color.jpg
Using Green Screen#
http://coweb.cc.gatech.edu/ice-gt/uploads/738/ICE%20025.jpghttp://exotic-place.com/wp-content/uploads/2013/12/new-york-skyline-exotic-place1.jpg
Step #1 – Foreground Select#
- Load Green Screen picture
- Click on the Foreground Select tool
- Free select around foreground
- Be sure to close the loop
- Stuff in foreground should be blue when done
- Select the foreground
- Paint the foreground area (you don’t need it all)
- Be sure to wait for refresh between painting
- Repeat until you have it all (i.e. all blue)
- Unpaint background, click the Mark background button.
- Free select around foreground
- Press Enter to create the selection mask.
Step #2 - Create Mask#
- Add Mask
- Layer ► Mask ► Add Layer Mask
- Initialize Layout Mask to: Selection
- Turn off your selection
- Selection ► None
Step #3 – Add Background#
- Use File ► Open as Layers
- Open the New York City image
- Notice that it places it on top of the other layers
- Put the Nice Background layer behind the other layer by dragging the layer down in the Layers sidebar.
- Resize the Canvas
- Image ► Fit Canvas to Layers
- Ctrl-Shift-J
Step #4 – Move Foreground Image#
- Place the girl
- Select the foreground layer
- Click on the Move tool
- Drag the foreground where you want it
- Export the Image as Flying
- If you wanted to save as a GIMP image, this would be a good time to do it. Don’t do this
Copy & Paste as a Layer#
pictureCopy & Paste as a Layer#
- Use Rectangular Selection Tool to select an area next to the reflection about the same size
- Copy
- Paste as a New Layer
- Select the Move Tool and move the piece into place over the reflection
- Save using the original name
Fading between Two Images#
pictureFading between Two Images#
- Start with picture named Left
- Image ► Canvas Size
- Make the size 1800 by 1500
- You need to click on the link so you can set individually
- Make the size 1800 by 1500
- Select the half of the picture
- Blur the Mask
- Be sure to Select ► All
- Filters ► Blur ► Gaussian Blur
- 200 horizontal, 0 vertical
- Put Right picture in a second layer
- Save as Fade.jpg
Galen in the Garden#
Assignment#
- Hand in the photos you edited based on the PowerPoint
- Galen in the Garden is optional
- Create a picture of yourself in an impossible situation.
- Although impossible, it should look realistic
- Use images of reasonable resolution, at least 800 by 600.
- Be careful with creating the mask, it will be part of your grade.